Thursday, March 31, 2016

3.31.2016

Jim continued on with more step flashing this morning...


Then continued down the rows with shingles.


Time for more roof jacks...


A better picture of the copper step flashing...


More pictures of the roof work...


Cutting a shingle for the hip edge...


We ran out of step flashing so we had to cut a section off one of the rolls and then cut it into 8" x 8" squares.


Making the bend in the square...


This is the last piece that we can do on the shingles right now.  The steps become very complicated - Jim needs the scaffolding on top of the roof in order to be able to put siding on the house.


Now it's time to work on the hip shingles.  First, Jim strikes a line down the hip as a guide.


Putting up the first hip shingle...


Progressing upward...


End-of-the day shot - hip shingles done as far as we can right now and house wrap put back in place over the flashing.  We are loving the way it's turning out!

 
High 66/Low 58
 

Wednesday, March 30, 2016

3.30.2016

This seemed to be the day for delivery issues.  It started last night - Jim got a call and voice mail from a strange NJ number late in the evening.  Once he listened to it, he discovered it was the delivery company for Lumber Liquidators saying they were delivering our flooring on Friday.  Jim had spent quite a bit of time yesterday trying to talk to the manager he worked with on the order - the guy never called him back.  Then the delivery is set up without our knowledge.  Jim was able to contact the delivery company and reschedule the delivery for next Tuesday.

Then this morning at about 8:00, Jim got a call from Albany Steel saying that they were at the property to drop off our steel!  Jim had to scramble to get out to the property and unload.  Pretty crazy since he just ordered it yesterday!   But this is the angle that he'll use in the staircase.


Jim got started on more shingles on the front of the auto bay - including getting the angle right for the hip connection.


Time to start putting shingles over the copper valley area.  This creates some challenges since Jim can't make connections in the copper so that there is no possibility of water issues.  Also, for the first time we are going to have cut shingles exposed - all the other cuts will be covered by the hip shingles.  Since a big feature of these shingles is that they are solid (the previous ones Jim worked with were honeycombed), once Jim makes a cut he can use his small grinder to rough up the exposed side and make it less of a harsh cut.  It turned out really well.


The shingles are all done on the valley connection to the front roof!


Putting up the roof jacks and plank so Jim can work higher.


Building up...


Next challenge is the step flashing that will go up the wall connection.  Jim had already cut some of these pieces to the right size, so the next step was to bend them in half.


I marked the halfway line on each of the pieces so that Jim could just bend them.


Trying out the first piece...


These pieces are nailed to the wall - there is no connection on the roof side.


The step flashing is sandwiched between the end shingles as you work your way up the wall...


Working up the wall with alternating shingles/step flashing...


End-of-the-day...a lot of the challenges have been worked out now, so tomorrow Jim can just continue on!

 
High 55/Low 42
 

Tuesday, March 29, 2016

3.29.2016 - First Copper!

These are all the measurements and angles that Jim had to figure out to design just the stairs going from the upper landing to the apartment!  He figured out the angle pieces he needed, got a quote this morning from the steel company in Albany, ordered them and they are supposed to arrive tomorrow!


Time to start working with some copper!  Jim cut some pieces that he will use for the step flashing that will go up between the roof section and the wall.


Then it was time for Jim to transfer his template to the copper to make the valley flashing.  Errors with copper are very expensive errors so it is pretty nerve-wracking!


Cutting the right shape...


This is the sheet of copper cut into the shape that Jim needs...


Now it's time to do some bending!  The copper is actually pushing the capacity of Jim's break, but it worked well on this first piece.


Some of the bends have to be done manually...


Before continuing further, we crossed our fingers and then went out to see if it fit - and it was a perfect fit!


Then it was back inside to do the final touches.  Each of the sides are "hemmed" - the edges are turned under so that it provides more stability to the side and allows for no sharp edges.


Jim has a special little tool that helps him hem the edges...


Here's the finished piece - it looks gorgeous!  Jim also made these little nail connection tabs.  He doesn't want to have any connections in the valley that could cause water issues.  These tabs clip onto the sides and then he will use them to nail into the roof sheathing.


We had to finish the membrane on the overhang/wall connection before we could put the copper up...


At the top of the valley, the copper laps over onto itself.  Jim put some caulk down first just to make sure that there would be no leakage at that point.


Placing the copper flashing into the valley...


At the top connection, Jim could use his stainless steel nails to connect to the wall - this will all be covered up by the siding.


A close-up view of Jim's nailer connection...


There are 7 clips he attached and nailed to the sheathing.  It's all in place and looks fabulous!


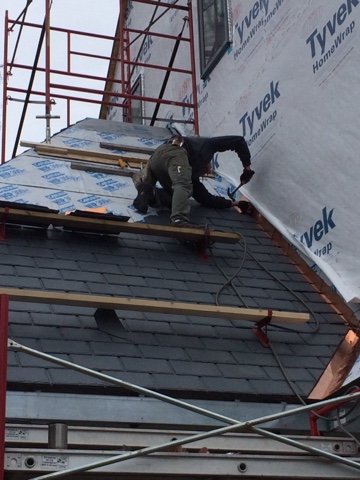
Time to start prepping for shingles.  Jim had to use the Bobcat as a platform to reach the edge of the roof.


Measuring for the top line of the shingles...


...and marking all the rafter positions too.


Now comes another tricky part. Jim wants a full shingle to be against the wall so that he will only have to cut one side of that row instead of two. Then the next row would be a half shingle next to the wall. However, since we have to start at the bottom where the overhang intersects, that becomes difficult to figure out. Jim had to try and project that wall line downward, calculate the width of each shingle plus the required gap, and figure out where to start on the bottom. But he got all that done. 

Putting on the first shingle on the front section!


Continuing on...


End-of-the-day picture - we are so happy with the fit and look of the copper flashing!

 
We had to cut the day a little short - Jim had a doctor appointment to get to.  Afterwards, we picked up 50 pounds of grass seed at TSC, as well as a few more roof jacks and planks at Lowe's. 
 
There were high wind warnings out today and the wind certainly made it feel cold!
 
High 42/Low 22